


Установка цифровой панели приборов VW Touareg 7L 2003–2010: 37 шагов с реальными фотографиями
Установка цифровой панели приборов VW Touareg 7L 2003–2010: 37 шагов с реальными фотографиями
Установка цифровой панели приборов VW Touareg 7L для модели 2003–2010 Это задокументировано здесь на основе реальной последовательности фотографий установки iKAGOO. Руководство следует запечатлённому на фото порядку: от снятия облицовки приборной панели и установки кластера до сохранения оригинальной платы приборов, прокладки кабеля к вещевому ящику со стороны пассажира и финальных проверок.
Самый важный технический момент в этом процессе виден на самих фотографиях: оригинальная плата приборов сохраняется, устанавливается на опору и снова подключается в зоне вещевого ящика со стороны пассажира.
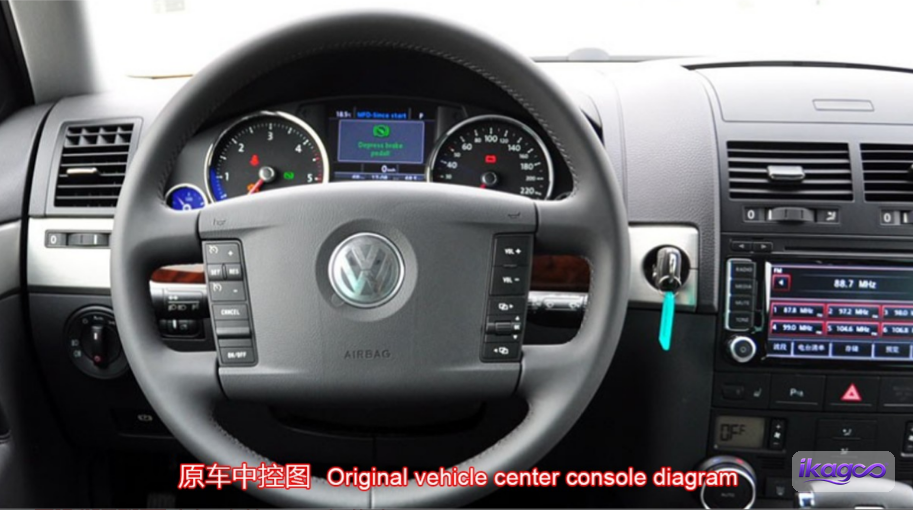
Вы снимаете оригинальную рамку панели приборов и кронштейны, подключаете и устанавливаете новый ЖК-кластер, прокладываете удлинительный кабель на сторону пассажира, сохраняете оригинальную плату приборов, переподключаете эту плату в зоне вещевого ящика, затем проверяете поддерживаемые данные автомобиля и функции предупреждений перед закрытием приборной панели.
На каких доказательствах основано это руководство по установке цифрового кластера VW Touareg 7L?
Прямой ответ: Это руководство основано на реальной последовательности установки iKAGOO Touareg: одна обложка плюс 36 пошаговых фото, с сохранением исходного порядка из 37 шагов. Изображения напрямую фиксируют снятие отделки и кронштейнов, установку нового кластера, прокладку удлинительного кабеля, сохранение оригинальной платы и размещение в перчаточном ящике.
Те же доказательства также определяют границы статьи. Поддерживаемая область применения продукта — VW Touareg 7L 2003–2010, но фотографии не доказывают, что каждый автомобиль в этом диапазоне лет имеет идентичную внутреннюю конфигурацию, и они не показывают процедуру кодирования, поэтому ни один из этих пунктов не представлен как универсальный факт.
VW / Volkswagen Touareg 7L, модельные годы 2003–2010. Для точной установки по-прежнему требуется, чтобы оригинальный кластер и конфигурация приборной панели соответствовали предложенному маршруту.
Исходная последовательность из 37 шагов на основе реального установочного материала iKAGOO, при этом каждая загруженная брендированная фотография сохранена с привязкой к своему исходному шагу.
В статье объясняется, как работа с щитком приборов со стороны водителя связана с последующим переносом оригинальной платы, а не рассматривает каждое фото как отдельную подпись.
Совместимость подтверждается по оригинальному щитку приборов, проёму панели приборов, платформе/конфигурации и деталям LHD/RHD, а не только по году выпуска.
Как снять рамку щитка приборов на VW Touareg 7L 2003–2010?
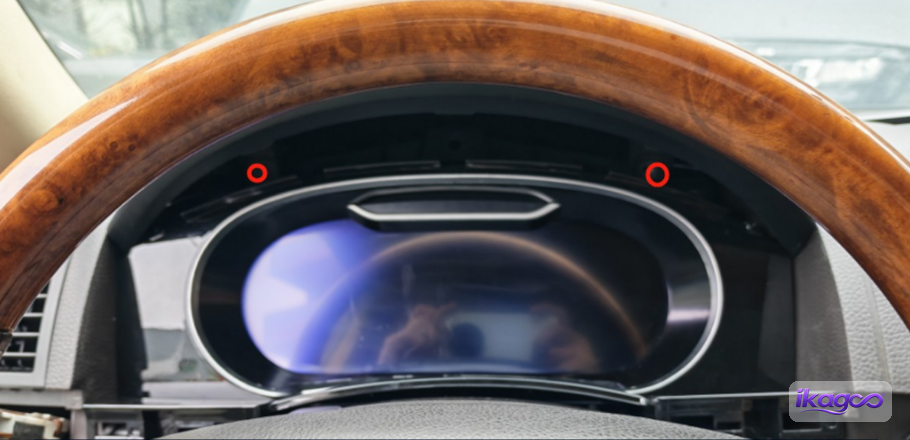
Прямой ответ: Сначала снимите облицовку в зоне рулевого колеса, затем боковую и верхнюю облицовку, после чего снимите открывшиеся винты и два кронштейна крепления приборов. На шаге 13 нужно сравнить открывшийся проём панели приборов с последовательностью фотографий iKAGOO перед подключением нового щитка приборов.
Зафиксируйте оригинальную панель приборов перед разборкой.
Начните с автомобиля в том виде, в котором он прибыл. Первое фото является ориентиром для исходного положения приборной панели, окружающей отделки и общей посадки в приборной панели. Сделайте собственное фото на этом этапе; это даст вам конкретный образец для сравнения, когда новая панель приборов и отделка будут установлены на место.
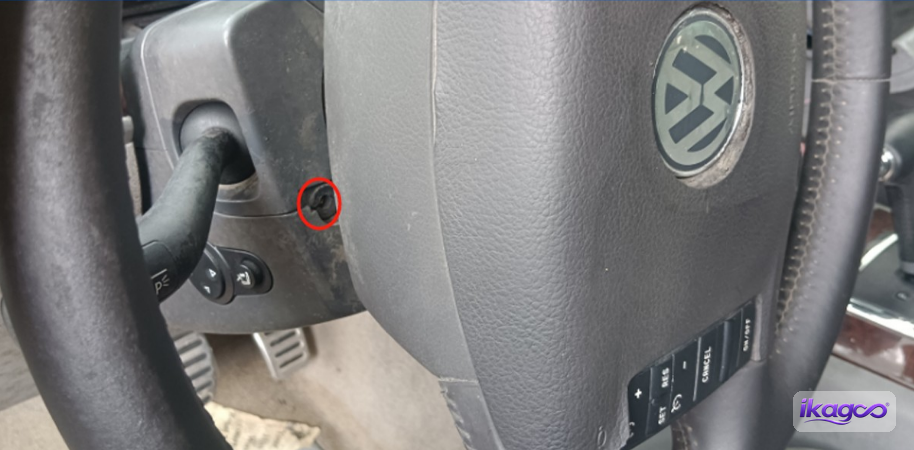
Открутите винт в зоне рулевого колеса
Открутите винт, показанный вокруг зоны рулевого колеса. Это первая точка крепления в показанной последовательности, и она открывает путь к отделке, которая снимается следующей.
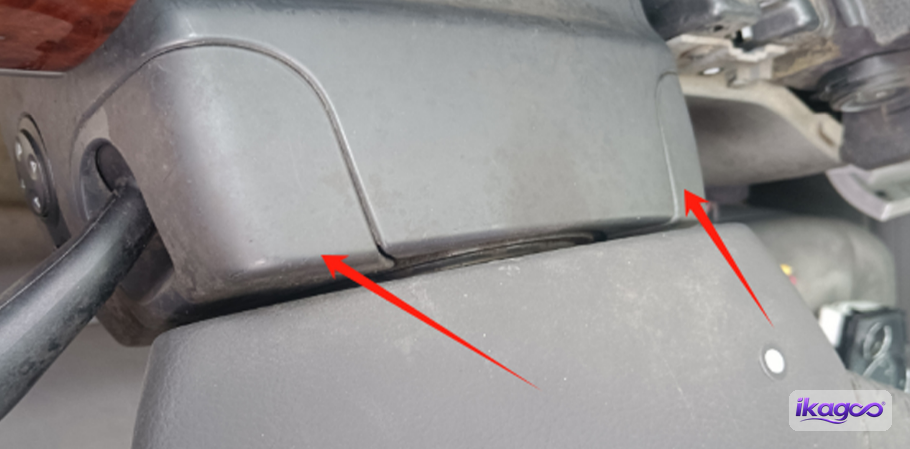
Освободите элемент отделки рулевого колеса
После того как винт извлечён, осторожно освободите элемент отделки, показанный вокруг зоны рулевого колеса. Работайте от видимого шва и освобождайте элемент постепенно, а не пытайтесь снять всю секцию одним движением.
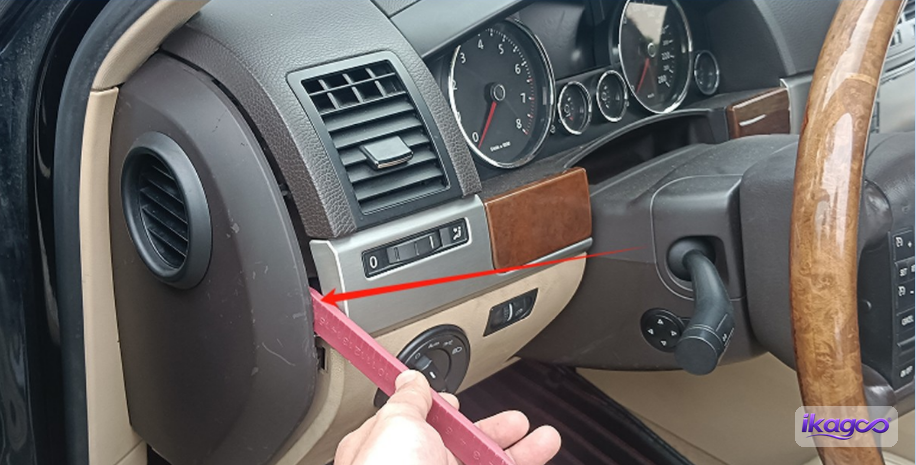
Откройте боковую облицовку рядом с панелью приборов
Перейдите к боковой части области приборов и отсоедините боковую облицовку, показанную на фото. Это начинает разделение элементов облицовки, которые фиксируют обрамление панели приборов в приборной панели.
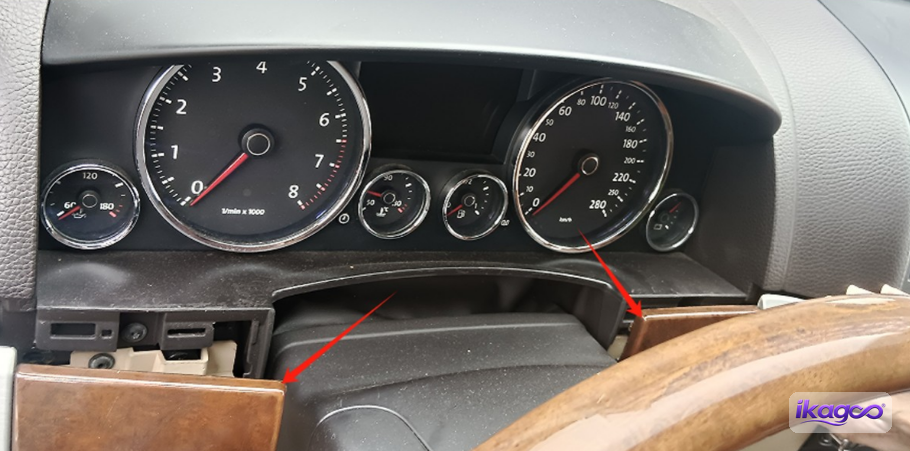
Отсоедините облицовку с обеих сторон
Продолжите по обеим сторонам обрамления панели приборов. Как только боковые элементы будут ослаблены, верхнюю облицовку можно снять, не борясь с панелями, которые все еще скреплены защелками.
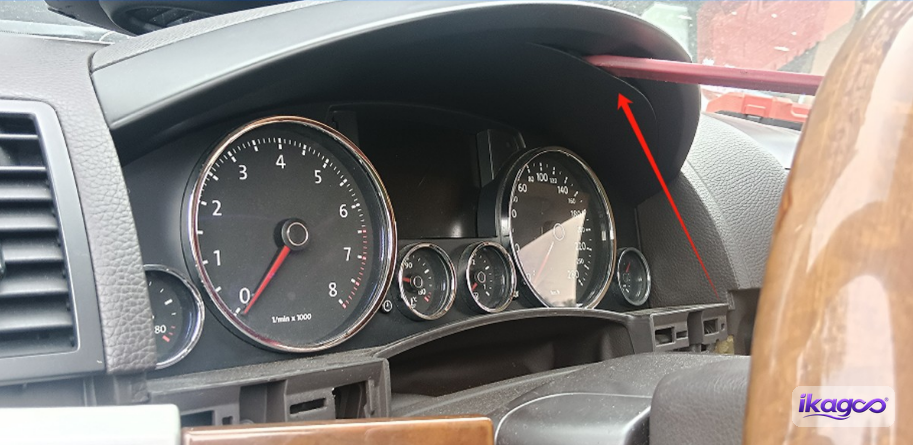
Снимите верхнюю декоративную облицовку
Отсоедините верхнюю декоративную деталь над панелью приборов. Снятие этой панели открывает следующие точки крепления в последовательности установки.
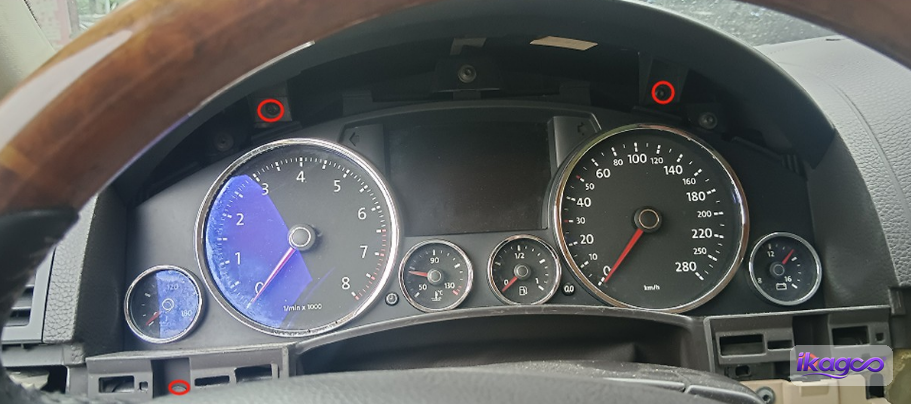
Удалите открытые винты
После того как верхняя накладка снята, удалите винты, которые теперь видны. Эти крепления удерживают окружающую конструкцию, которую необходимо снять, прежде чем можно будет добраться до кронштейнов крепления приборной панели.
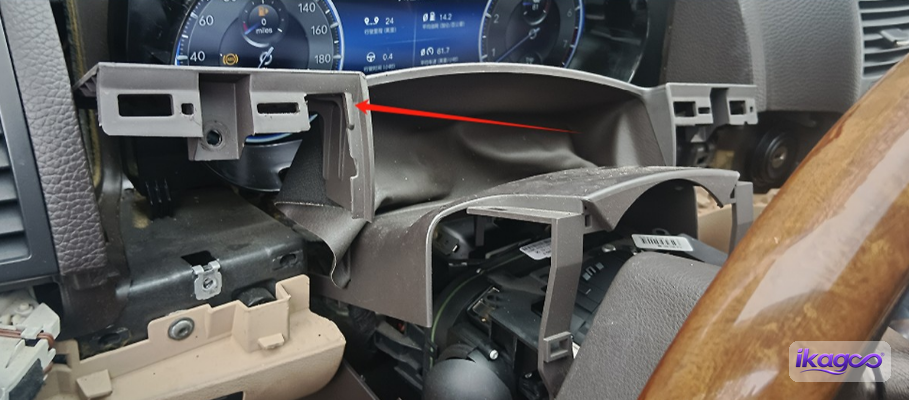
Освободите оставшуюся боковую накладку
На следующем фото снова показана боковая накладка. Освободите оставшиеся детали с обеих сторон и поддерживайте накладку, когда она будет отделяться от приборной панели.
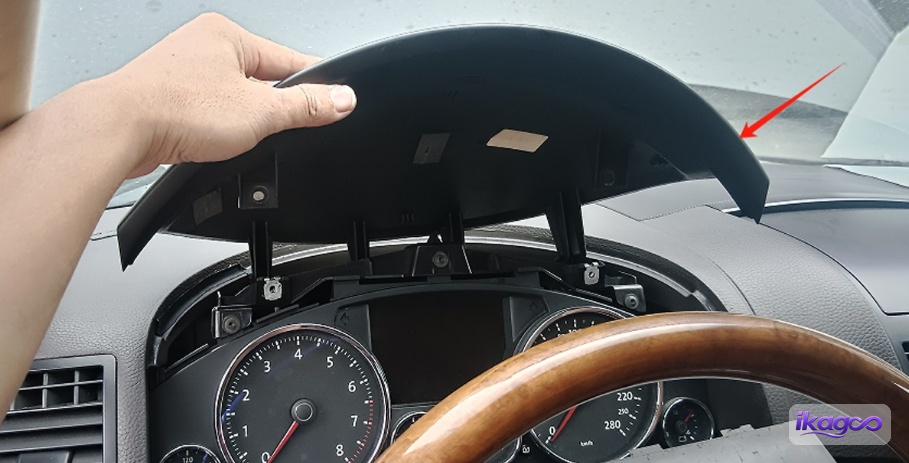
Снимите верхнюю секцию накладки вокруг области приборов
Теперь снимите оставшуюся верхнюю часть облицовки, показанную на фото. На этом этапе монтажная конструкция панели приборов начинает становиться полностью видимой.
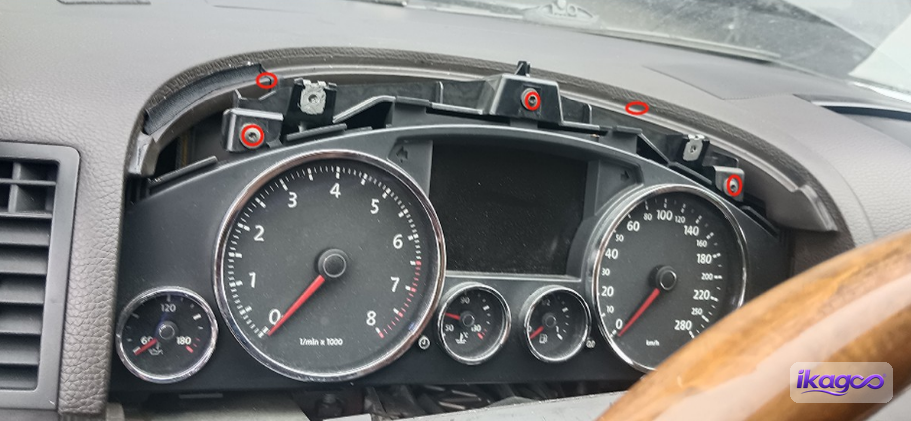
Открутите винты кронштейна крепления приборной панели
Открутите винты, удерживающие кронштейн крепления приборной панели. Это тот момент, когда работа меняется от снятия декоративной облицовки к удалению конструкции, которая физически фиксирует панель приборов.
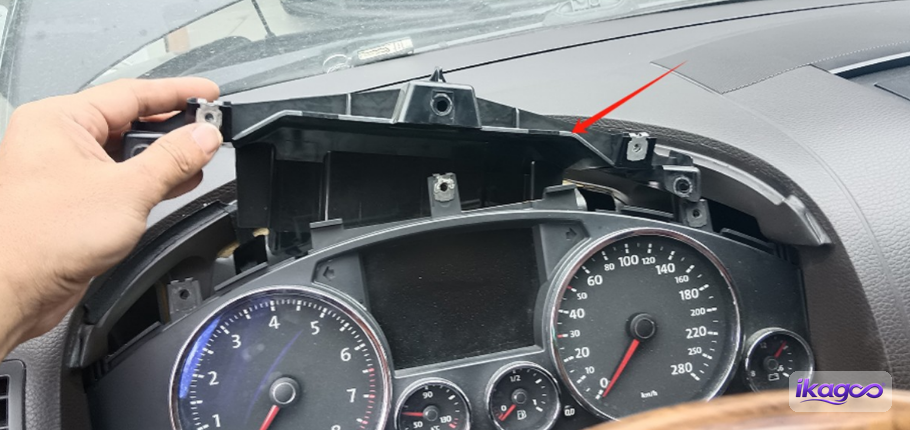
Извлеките первый монтажный кронштейн
После удаления его винтов извлеките первый кронштейн, показанный в последовательности. Храните его вместе с крепёжными элементами, так как он является частью исходной монтажной схемы.
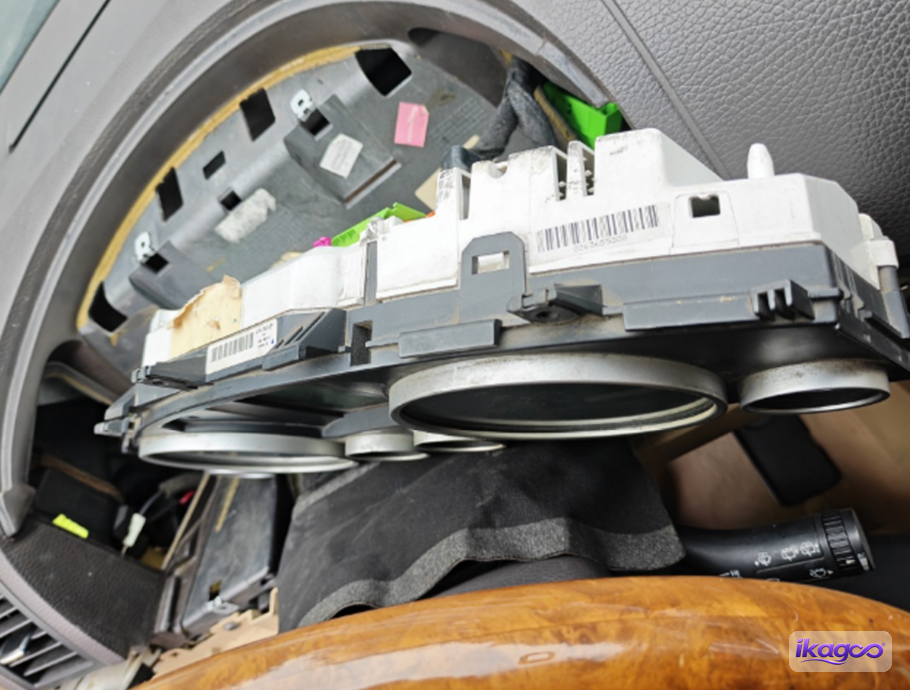
Снимите второй кронштейн
Снимите второй кронштейн в той же области. Когда обе части кронштейна будут извлечены, проем панели приборов будет достаточно свободен, чтобы сравнить его с новой схемой расположения комбинации приборов.
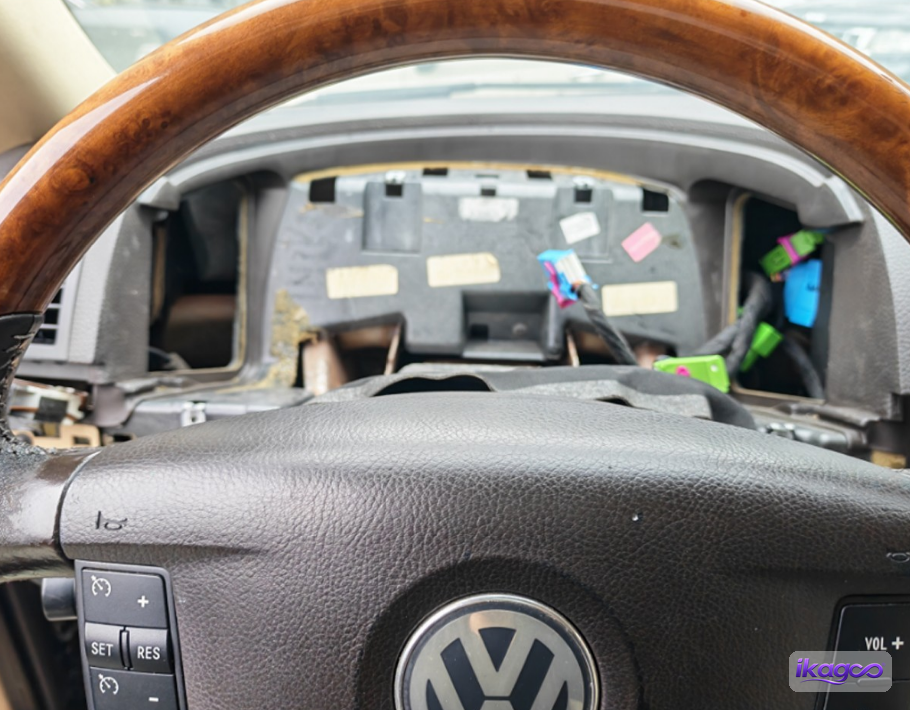
Сравните открывшийся проем перед подключением новой комбинации приборов
Остановитесь здесь и сравните проем вашей панели приборов с фотографией. Это наиболее полезный момент, чтобы обнаружить несоответствие посадки до того, как будет подключено или вставлено на место новое оборудование.
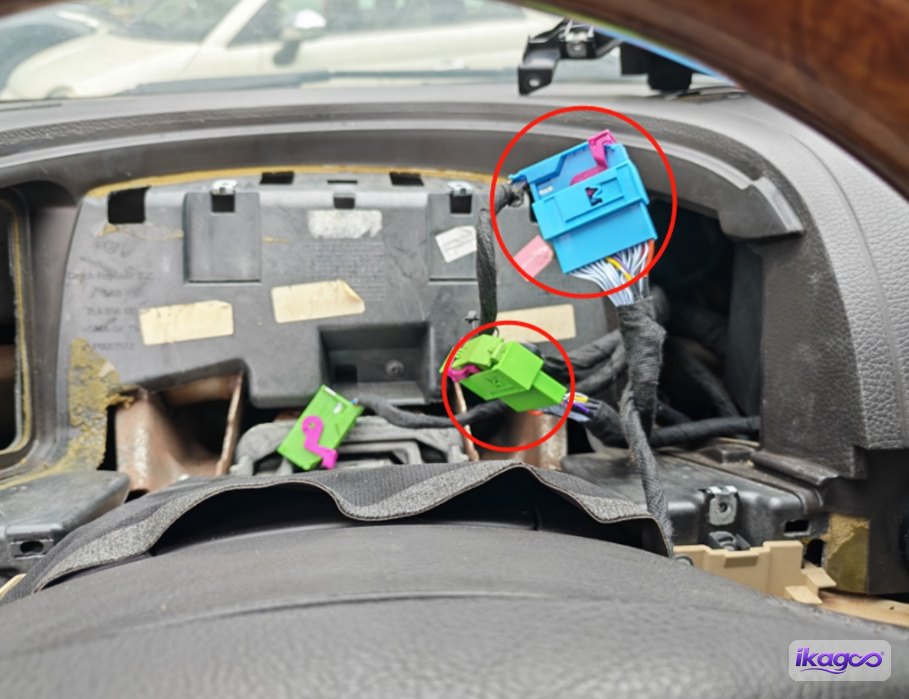
Как подключается цифровая панель приборов iKAGOO в VW Touareg 7L 2003–2010?
Прямой ответ: Подключите основной силовой разъем и тонкий разъем панели приборов, совместите обе нижние крепежные ножки с оригинальными винтовыми стойками, установите панель в проем, проложите удлинительный кабель в сторону перчаточного ящика, затем закрепите панель и установите на место облицовку. Соответствие разъемов и прокладку кабеля следует проверить до закрытия устройства.
Подключите основной силовой кабель
Подключите основной силовой кабель к новой ЖК-панели приборов, как показано. Разъем должен соответствовать прилагаемому гнезду и встать в правильной ориентации.
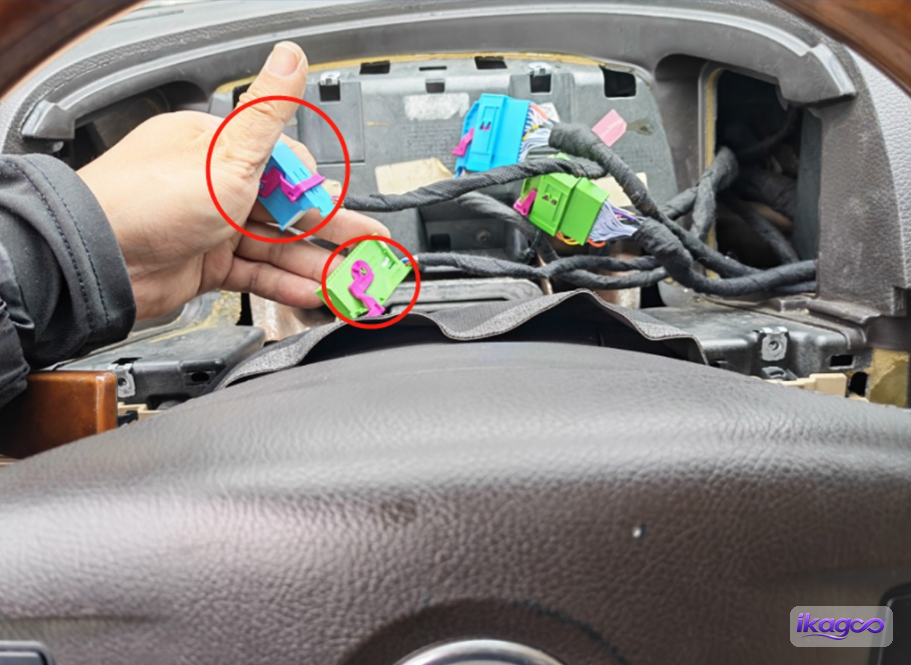
Подключите тонкий разъем к ЖК-панели приборов
Вставьте тонкопроволочный разъём, показанный на фото, в соответствующий разъём на ЖК-панели. Убедитесь, что он полностью установлен, прежде чем панель будет перемещена к проёму приборной панели.
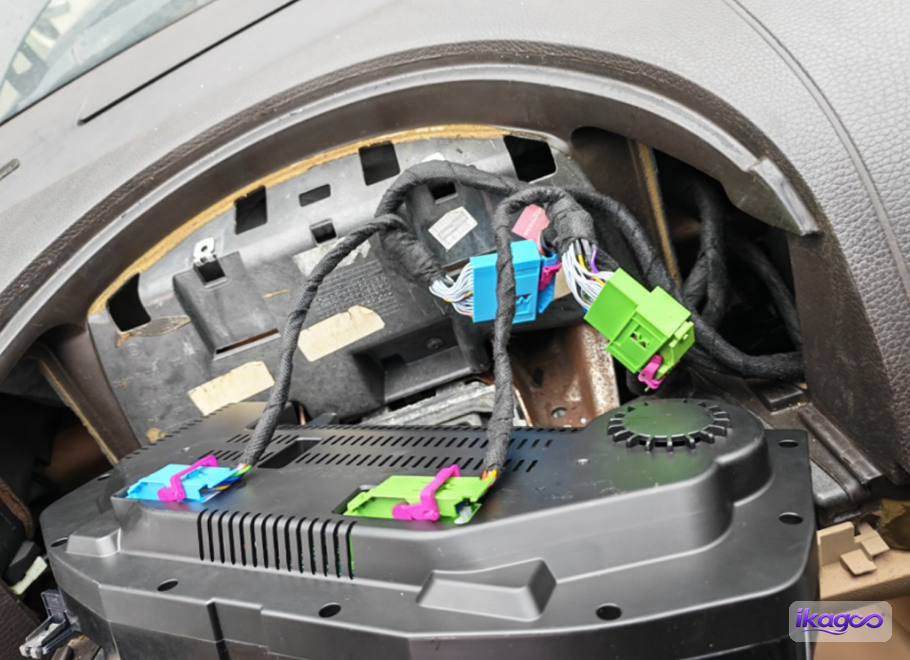
Проверьте оба подключения панели перед установкой
Прежде чем дисплей попадёт в приборную панель, посмотрите на выполненные соединения, показанные на фото. Это последняя простая возможность исправить не до конца вставленный разъём, прежде чем задняя часть панели станет труднодоступной.
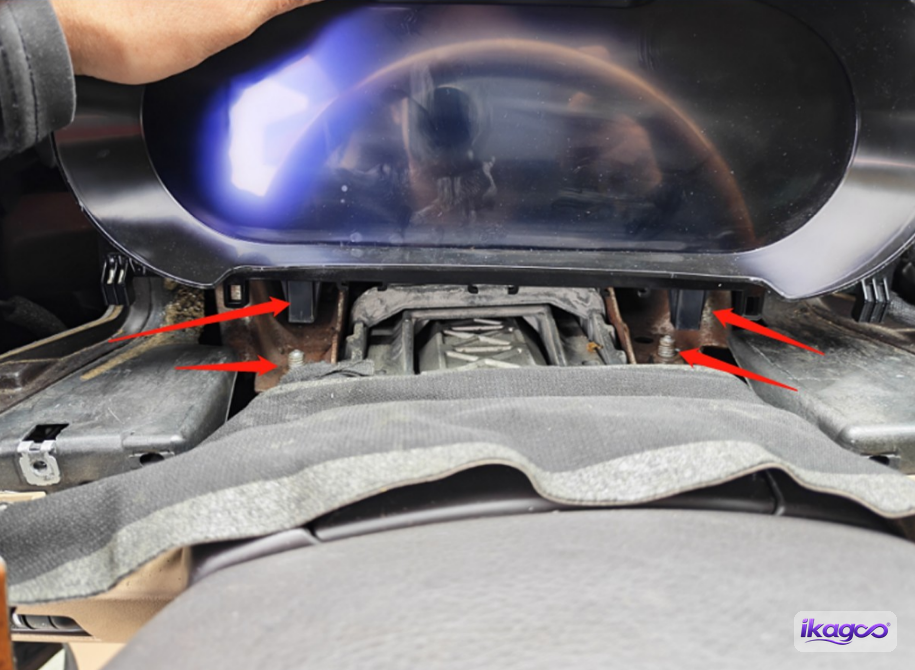
Совместите две нижние ножки с оригинальными винтовыми стойками
Выровняйте две нижние монтажные ножки новой ЖК-панели по оригинальным винтовым стойкам, показанным на фото. Обе стороны должны совпасть с заводскими точками крепления до затягивания любого винта.
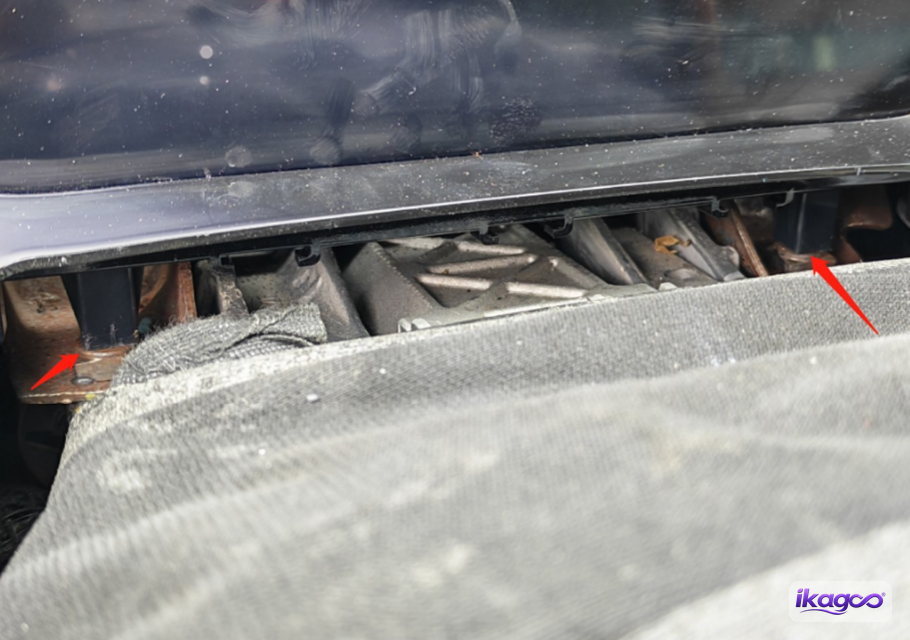
Убедитесь, что кластер установлен ровно.
Удерживайте кластер в выровненном положении и проверьте зазор по периметру корпуса. Устройство должно естественно лежать в проёме, а не притягиваться винтами.
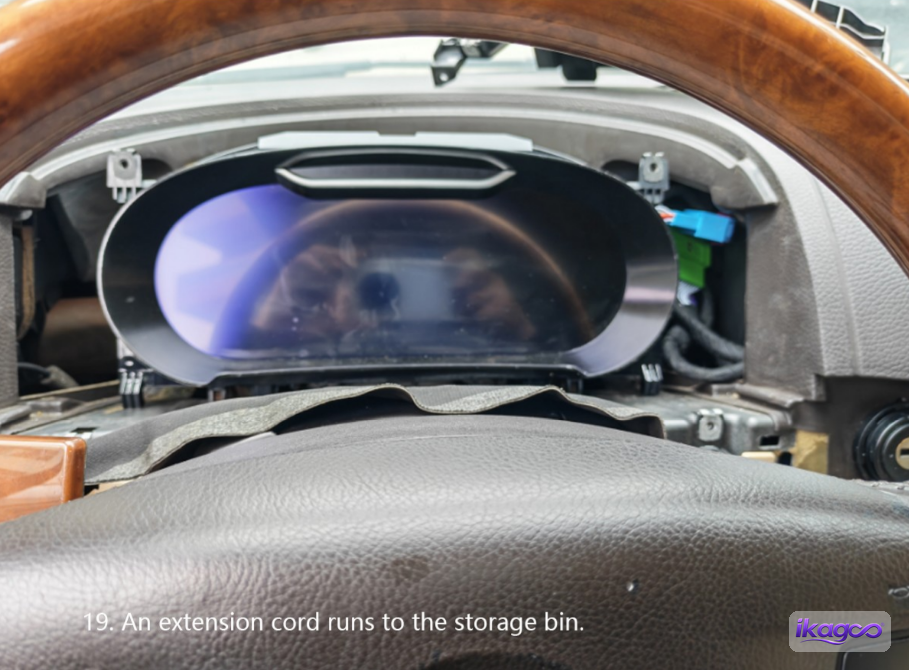
Поместите ЖК-кластер в нужное положение.
Переместите кластер в его конечное положение на приборной панели. Следите, чтобы проводка за устройством оставалась свободной, когда корпус движется внутрь, чтобы передняя посадка не достигалась за счёт зажатого позади кабеля.
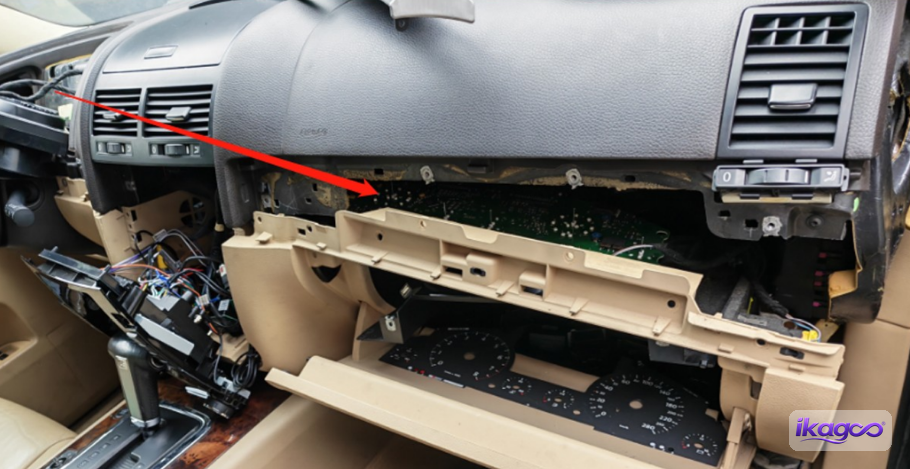
Проложите удлинительный кабель в сторону пассажирского бардачка.
В данной последовательности действий теперь вводится удлинительный кабель, который идёт от зоны кластера к пассажирскому бардачку. Проложите его по указанному маршруту и оставьте достаточно длины для сохранённой оригинальной материнской платы, которая будет подключена позже.
Закрепите новый кластер
После выравнивания кластера и обеспечения свободного прохождения удлинительного кабеля установите монтажные винты. Затяните устройство в положении, в котором оно уже стоит правильно, а не используйте винты для вытягивания корпуса в соосность.
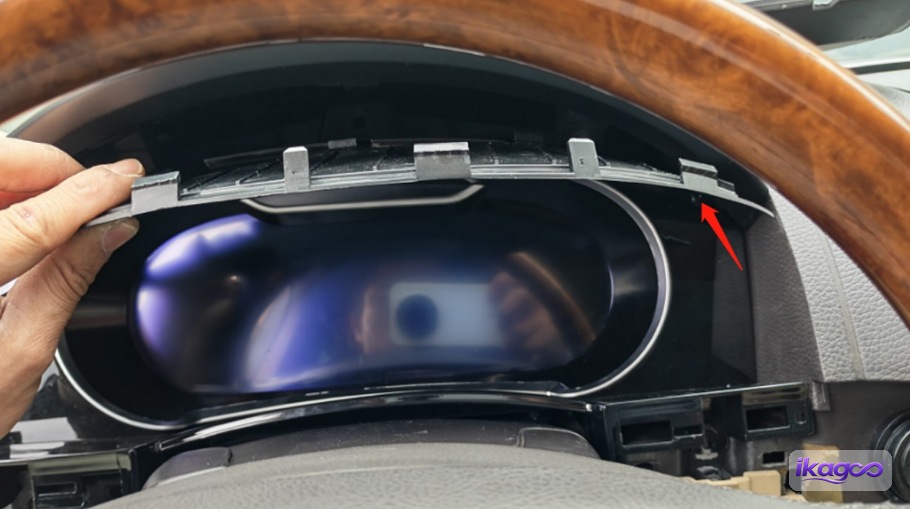
Установите облицовку ЖК-кластера
Защёлкните новую облицовку кластера на место вокруг дисплея. Пройдитесь по краю и убедитесь, что облицовка сидит ровно, заподлицо с проёмом приборной панели.
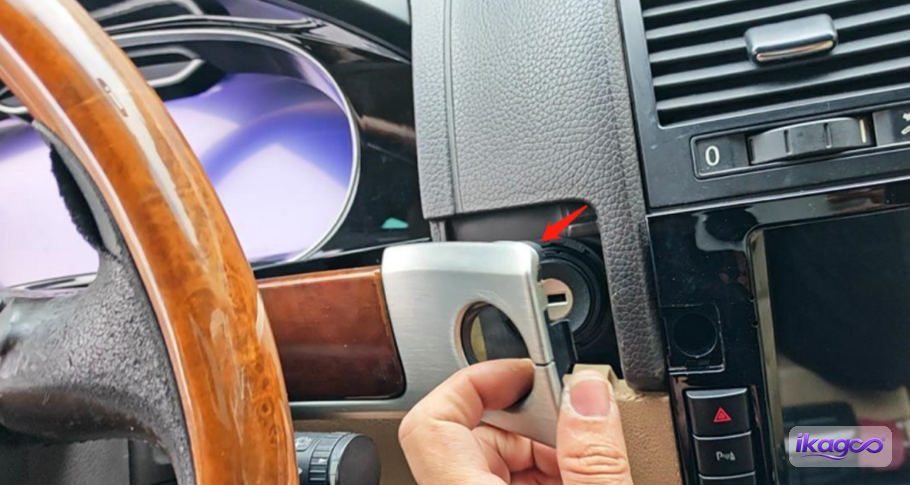
Установите обратно оригинальную боковую накладку
Верните оригинальные накладки на обе стороны щитка приборов. Это первая визуальная проверка того, что новый узел установлен так, как ожидает оригинальная приборная панель.
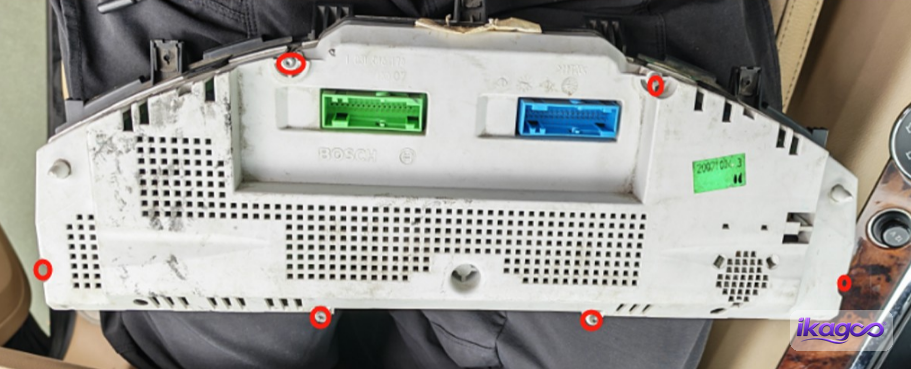
Почему при переоборудовании цифрового щитка приборов VW Touareg 7L 2003–2010 сохраняется оригинальная основная плата?
Прямой ответ: Этот задокументированный маршрут iKAGOO сохраняет оригинальную основную плату приборов Touareg вместо того, чтобы выбрасывать всю заводскую электронику кластера. На исходных фотографиях показано, как открывается оригинальный кластер, извлекается плата, а затем закрепляется на прилагаемой металлической опоре.
Открутите винт на оригинальном щитке приборов
Теперь работа переходит к самому оригинальному щитку приборов. Открутите винт, показанный на фото, чтобы можно было открыть оригинальный корпус. С этого момента оригинальный кластер разбирается, поскольку часть его электроники останется в автомобиле.
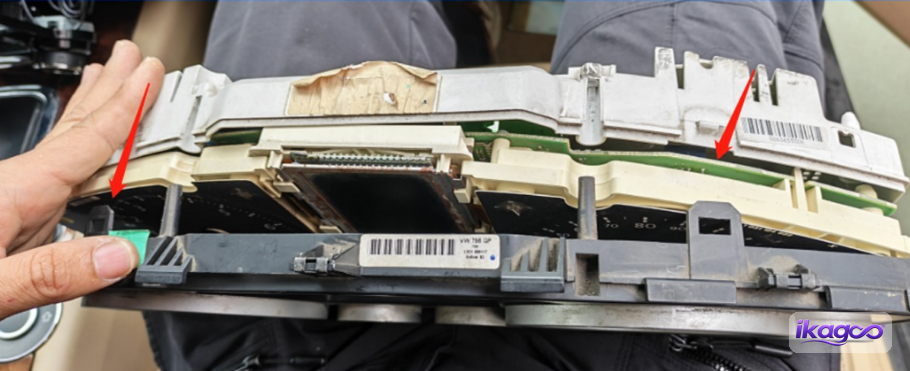
Откройте оригинальный корпус кластера
Аккуратно отделите оригинальный корпус приборной панели. Цель — не просто разобрать старый щиток приборов, а добраться до электроники, которую показанный на фото вариант доработки сохраняет и переносит.
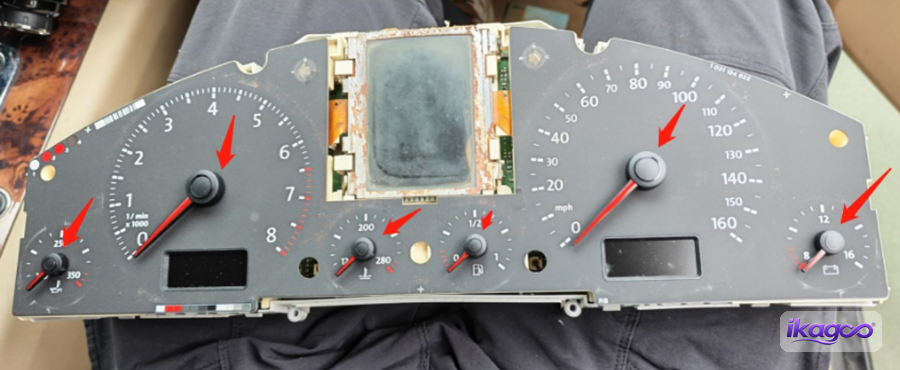
Снимите оригинальные стрелки
Поднимите стрелки, показанные на исходном фото, чтобы щиток можно было открыть дальше. Храните снятые оригинальные детали вместе, пока не будет завершён этап переноса платы.
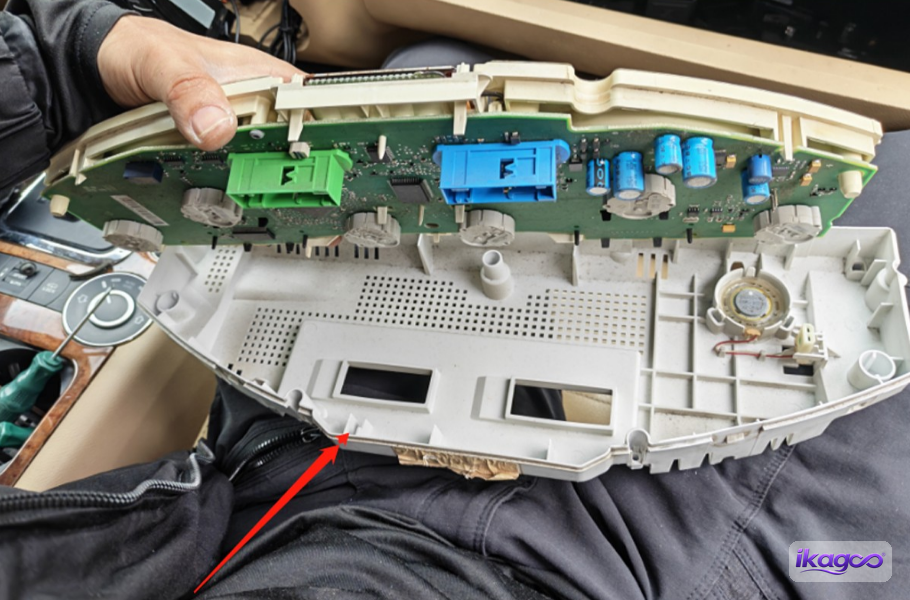
Освободите нижний корпус
Откройте нижний корпус, показанный на фото. Это открывает доступ к внутреннему соединению и оригинальной главной плате прибора, используемой на следующих шагах.
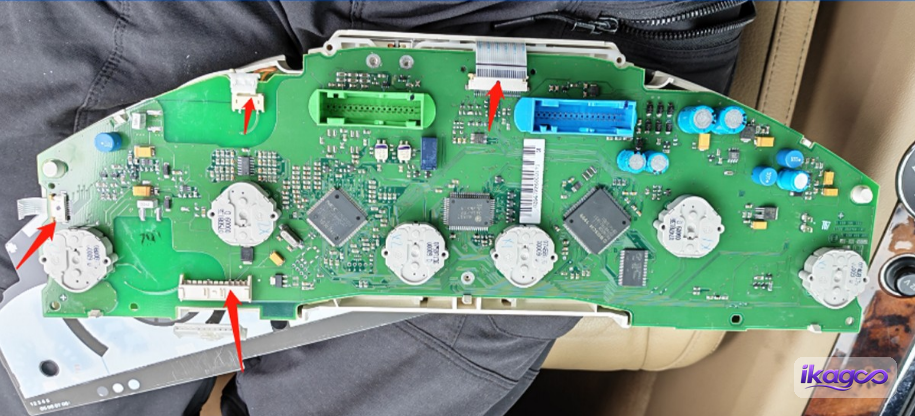
Отсоедините внутренний кабель панели приборов
Отключите внутренний кабель, показанный внутри оригинальной панели приборов. После отсоединения этого разъёма материнскую плату можно отделить от оригинального корпуса.
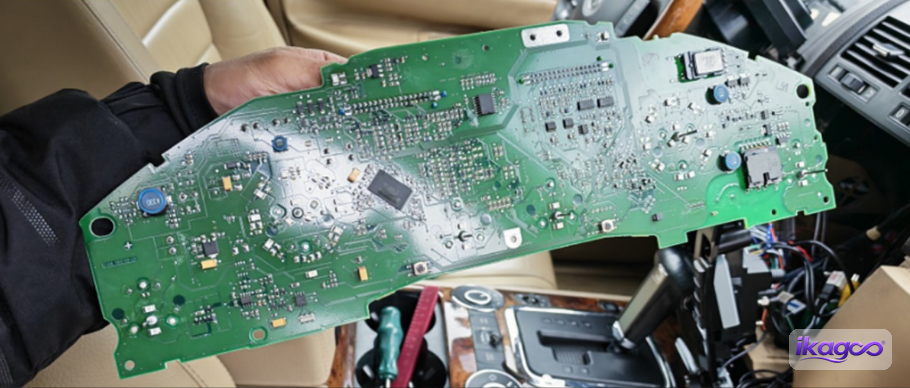
Сохраните оригинальную материнскую плату панели приборов
Это ключевой технический шаг в данном варианте установки: оригинальная материнская плата панели приборов Touareg сохраняется. Исходная последовательность не отбрасывает её; плата продолжает использоваться в финальной установке.
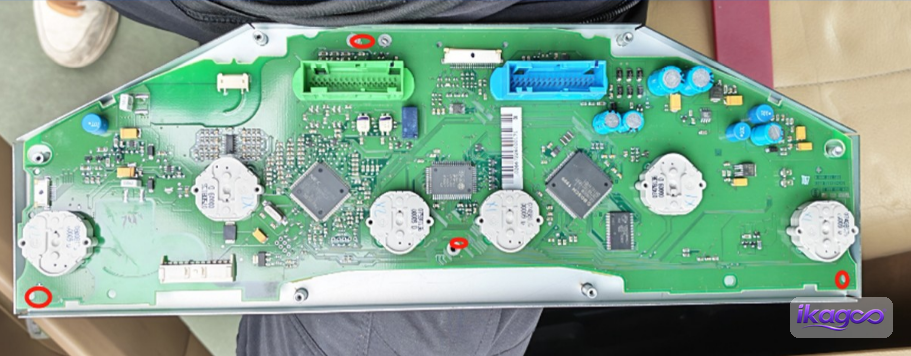
Установите сохранённую основную плату на металлическую опору
Расположите оригинальную основную плату на прилагаемой металлической опоре точно так, как показано на фото. Опора обеспечивает надёжное крепление платы после её извлечения из оригинального корпуса комбинации приборов.
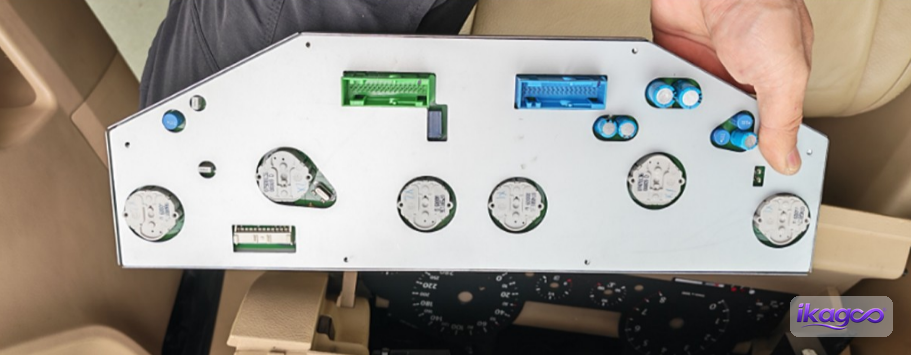
Убедитесь, что оригинальная основная плата надёжно закреплена
Проверьте выполненное крепление платы перед перемещением её на сторону пассажира. Плата должна оставаться закреплённой на опоре, а её точка подключения должна быть доступна для проводки, показанной далее.
Куда помещается оригинальная основная плата VW Touareg 7L 2003–2010 после переоборудования?
Прямой ответ: Сохранённая оригинальная основная плата устройства размещается в зоне вещевого ящика со стороны пассажира. Отделка вещевого ящика открывается, проводка платы подключается повторно, и плата остаётся закреплённой там в рамках окончательной установки.
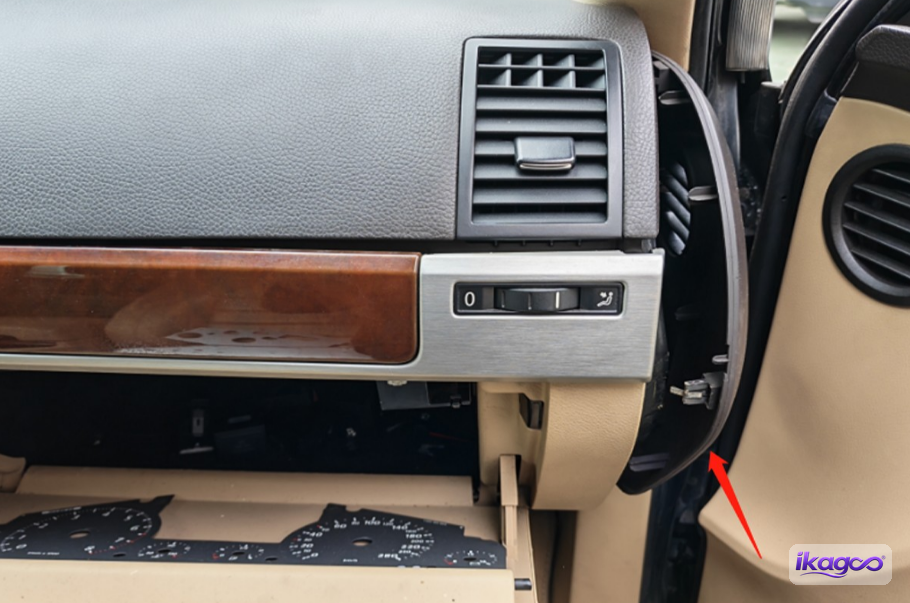
Откройте панель со стороны пассажира.
Перейдите на сторону пассажира и отщёлкните боковую панель рядом с вещевым ящиком. Это открывает путь доступа для удлинительного кабеля и сохранённой оригинальной основной платы.
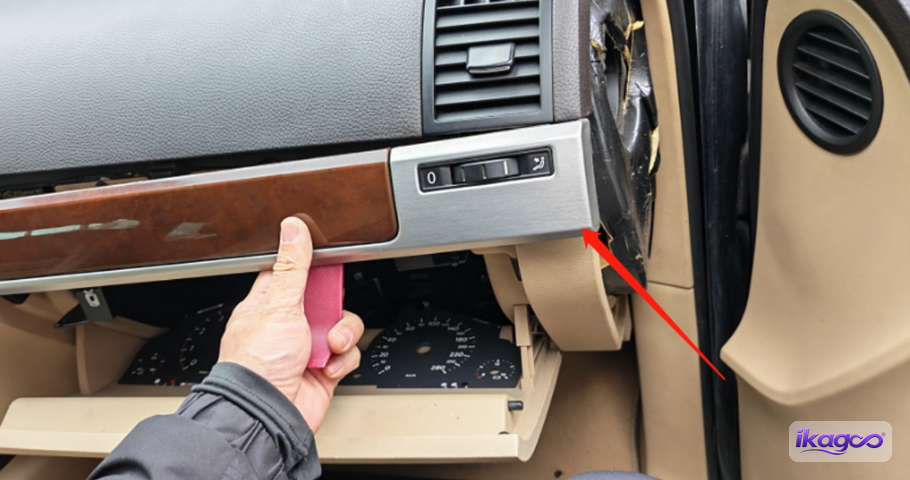
Отщёлкните накладку со стороны вещевого ящика.
Снимите дополнительную деталь отделки, показанную вокруг вещевого ящика. Открываются только те панели, которые необходимы для доступа к отсеку для хранения и месту расположения платы.
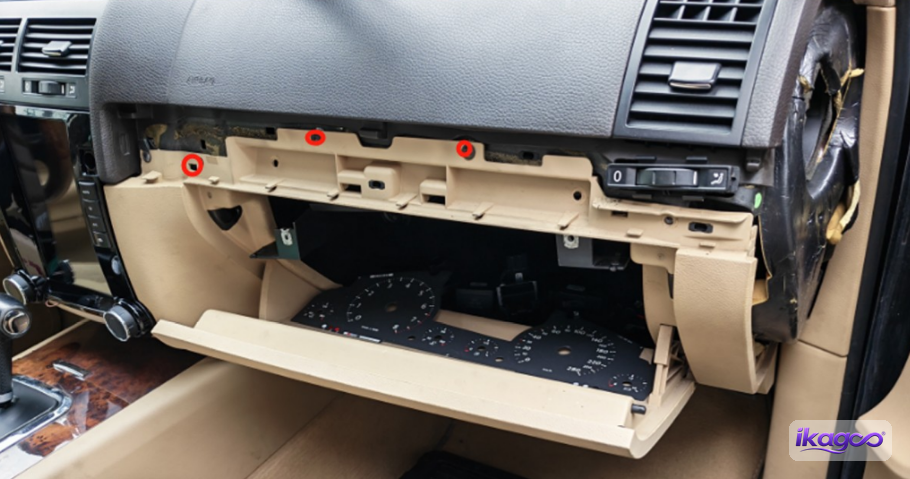
Выкрутите винты вещевого ящика.
Открутите винты, удерживающие бардачок/отсек для хранения. Это создаёт рабочее пространство, необходимое для подключения и размещения сохранённой оригинальной главной платы приборной панели.
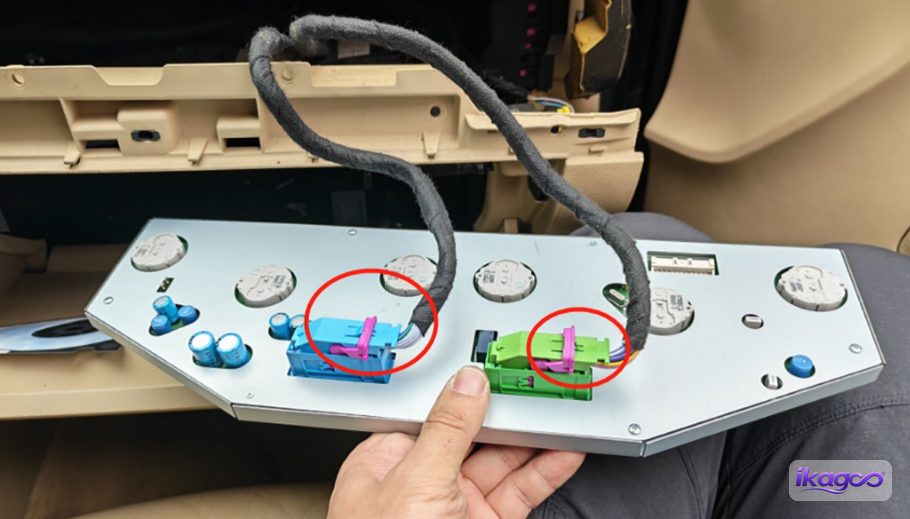
Подключите сохранённую оригинальную главную плату
Подключите проводку к сохранённой оригинальной главной плате, как показано. Это соединение завершает маршрут, начатый при протягивании удлинительного кабеля от новой приборной панели на шаге 20.
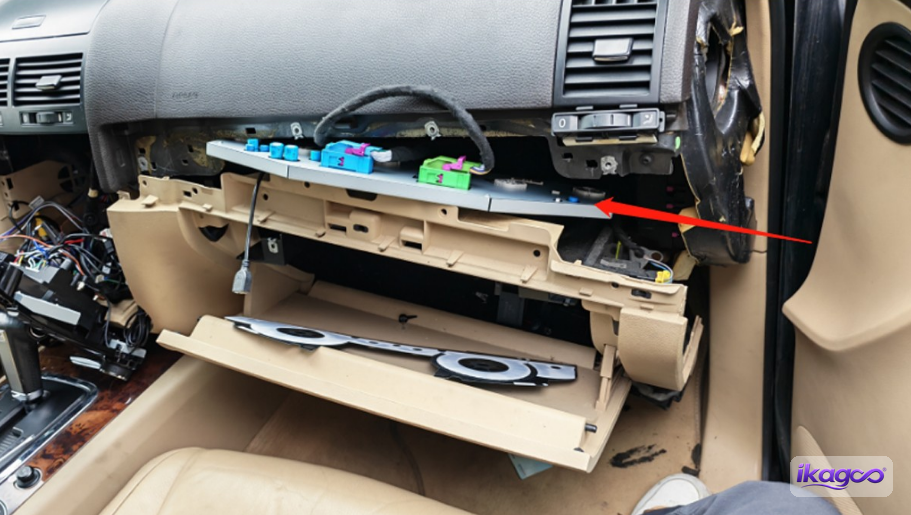
Разместите сохранённую главную плату в зоне бардачка
Разместите сохранённую оригинальную главную плату в зоне бардачка со стороны пассажира, следуя расположению на фотографии. Перед закрытием бардачка убедитесь, что плата остаётся закреплённой на своей опоре, а проводке хватает места, чтобы оставаться подключённой без защемления.
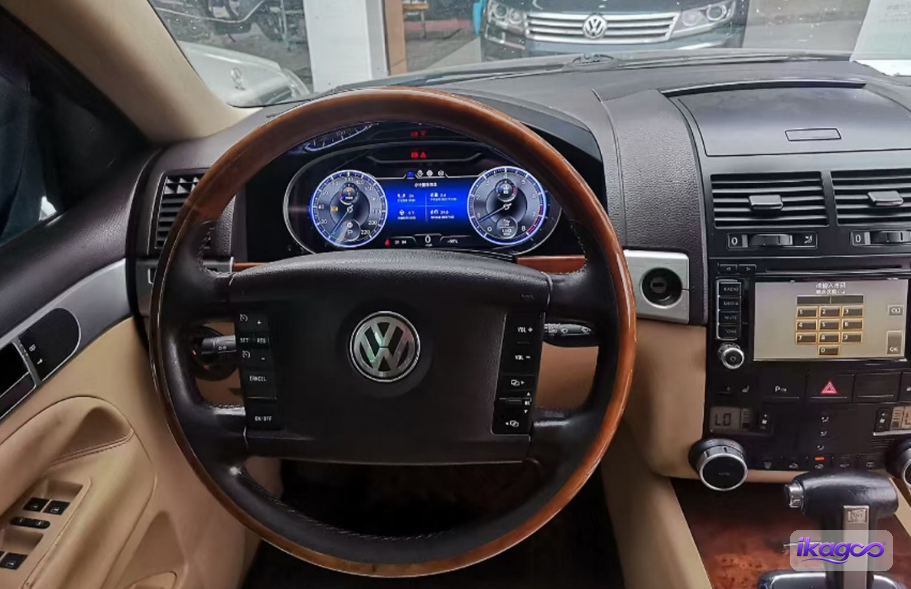
Включите питание и проверьте установку перед окончательным закрытием
В оригинальном источнике последний шаг описывается как готовый результат установки, но извлечённый набор шагов не содержит отдельного изображения шага 37. Перед обычной эксплуатацией включите зажигание автомобиля и проверьте функции, применимые к подтверждённой версии приборной панели.
Что следует проверить после установки цифровой приборной панели на Volkswagen Touareg 7L 2003–2010?
Прямой ответ: перед закрытием панели приборов проверьте стабильный запуск приборной панели, поддерживаемые показатели скорости/оборотов и информации об автомобиле, предупреждающие индикаторы, связь приборной панели, подключение сохранённой главной платы и физическую посадку отделки. Поведение CarPlay или синхронизации карт, зависящее от конкретного продукта, следует проверять только в соответствии с подтверждённой конфигурацией.
Информация о вождении
Проверьте поддерживаемое отображение скорости и оборотов, значения уровня топлива и температуры, положение передачи и статус дверей для соответствующей конфигурации.
Предупредительная информация
Убедитесь, что поддерживаемые предупреждающие индикаторы отображаются нормально и не остаётся необъяснимой неисправности связи приборной панели.
Физическая посадка
Проверьте, что приборная панель и отделка сидят правильно, а проводка не сдавливается при возврате панелей на место.
Функции отображения, зависящие от продукта
Отображение навигации или карт CarPlay следует оценивать только в соответствии с маршрутом функций, подтверждённым для приобретённой версии продукта.
Почему долгосрочная поддержка важна для цифровой приборной панели Volkswagen Touareg 7L 2003–2010?
Прямой ответ: долгосрочная поддержка важна, потому что это дооснащение Touareg сочетает новый цифровой дисплей с определённым маршрутом жгута проводов и сохранённой оригинальной главной платой приборной панели. Если позже возникнет проблема, исходный заказ, версия оборудования и маршрут проводки могут потребоваться для определения правильного программного обеспечения, детали или пути ремонта.
На текущей странице продукта Touareg указано, что iKAGOO обеспечивает долгосрочную послепродажную поддержку, связанную с исходным заказом, для консультаций по программному обеспечению, поддержки по деталям и координации ремонта, наряду с 12-месячной гарантией на оборудование. Это различие важно: гарантия имеет определённый период покрытия, тогда как ценность отслеживаемой записи о продукте/поддержке может сохраняться и после установки.
Это одна из причин, по которой решение о покупке не должно основываться только на самой низкой цене в первый день. Цифровая приборная панель может оставаться в автомобиле годами; возможность продавца позже идентифицировать поставленный маршрут может снизить риск покупки несовместимых запасных частей или диагностики не той версии.
Подходит ли это обновление до цифровой приборной панели для Volkswagen Touareg 7L 2003–2010 моему автомобилю?
Стоит ли обновление до цифровой приборной панели на Volkswagen Touareg 7L?
Доказательства установки показывают, как выполняется обновление, а не то, что оно нужно каждому владельцу. Наиболее убедительный случай для обновления — владелец, который действительно хочет перехода на цифровую кабину и планирует сохранить автомобиль. Процент, специфичный для Touareg, здесь не выдумывается, пока базовый показатель на странице продукта всё ещё корректируется.
Подойдёт ли эта цифровая приборная панель iKAGOO для моего Volkswagen Touareg 7L?
Совместимость проверяется по форме оригинальной приборной панели, проёму панели приборов, платформе/конфигурации, положению руля и любым предыдущим модификациям. Диапазон годов — это область применения продукта, а не замена такой проверке.
Могу ли я сам установить цифровую приборную панель на VW Touareg 7L?
L3 · Продвинутый уровень DIY. В процессе снимается приборная панель и несколько элементов отделки, прокладывается удлинительный кабель и сохраняется/переносится оригинальная электронная плата. Это выходит за рамки простой установки аксессуара.
Когда следует остановить установку, а не продолжать?
Остановитесь, если разъём не подходит, отверстие приборной панели существенно отличается от описанного маршрута, требуемую оригинальную плату невозможно правильно сохранить или итоговая критически важная информация о движении не отображается нормально.
VW Touareg 7L 2003–2010 Установка цифровой приборной панели: часто задаваемые вопросы
Является ли цифровая приборная панель VW Touareg 7L полностью готовой к установке?
Нет, в смысле “отсоединить один разъём — и работа закончена”. В этом маршруте iKAGOO используются совместимые разъёмы, но реальная установка также включает снятие отделки приборной панели и кронштейнов, монтаж новой приборной панели, прокладку удлинительного кабеля и сохранение оригинальной материнской платы приборов. Это лучше рассматривать как доработку под конкретный автомобиль, а не как простую замену аксессуара.
Подойдёт ли эта цифровая приборная панель для любого VW Touareg 7L 2003–2010?
Не следует делать вывод об универсальной совместимости только по году выпуска. Перед отправкой необходимо проверить форму оригинальной приборной панели, отверстие в приборной панели, левый или правый руль, рынок/комплектацию и предыдущие изменения приборной панели или проводки. Если отверстие на шаге 13 не соответствует описанному маршруту, остановитесь, прежде чем силой вставлять новую приборную панель на место.
Требует ли установка цифровой приборной панели VW Touareg 7L кодирования или VCDS?
В источнике фотографий iKAGOO, использованном для этого руководства, шаг кодирования не показан, поэтому данная статья не утверждает, что кодирование всегда требуется или никогда не требуется. Владельцы Touareg часто спрашивают о кодировании при замене оригинальных приборных панелей, но этот маршрут для неоригинальных деталей отличается тем, что сохраняет оригинальную материнскую плату приборов. Уточните точную поставляемую конфигурацию, если кодирование или настройка параметров актуальны для вашего автомобиля.
Нужно ли программировать иммобилайзер или заново адаптировать ключи?
В описанной установке iKAGOO не показана процедура адаптации ключа или иммобилайзера. Не применяйте автоматически инструкции по замене полной бывшей в употреблении оригинальной приборной панели Touareg к этой доработке, поскольку на фотографиях маршрут сохраняет оригинальную материнскую плату приборов. Если вашему автомобилю или поставляемой версии требуется какая-либо дополнительная адаптация, это следует уточнить перед установкой.
Сохранится ли мой оригинальный пробег после установки цифровой приборной панели?
Фотографии установки не подтверждают поведение с обработкой пробега, поэтому данное руководство не обещает универсального результата. Поскольку вопросы о пробеге часто возникают при замене приборной панели Touareg, если это для вас критично, попросите iKAGOO подтвердить маршрут пробега/отображения для точной поставляемой версии перед заказом.
Почему эта цифровая приборная панель Touareg сохраняет оригинальную материнскую плату приборов?
Потому что это фактический маршрут, показанный в источнике установки iKAGOO. Шаги 24–31 включают вскрытие оригинальной приборной панели, сохранение её материнской платы и крепление её к металлическому кронштейну. Она не рассматривается как выбрасываемое оборудование.
Где размещается оригинальная материнская плата приборов Touareg после установки?
В этом описанном маршруте сохранённая оригинальная материнская плата подключается заново и размещается в области бардачка со стороны пассажира. Шаги 32–36 показывают, как открывается пассажирская отделка и бардачок, подключается проводка платы и плата остаётся в этой области.
Будут ли по-прежнему работать скорость, обороты, уровень топлива и предупреждающие индикаторы?
Это основные проверки приёмки, а не функции, которые следует слепо предполагать. Прежде чем окончательно закрыть приборную панель, проверьте поддерживаемые скорость/обороты, топливо/температуру, информацию о передаче или дверях, где применимо, предупреждающие индикаторы и связь приборной панели для соответствующей конфигурации автомобиля. Если критически важная информация отсутствует или остаётся новое необъяснимое предупреждение, установку не следует считать завершённой.
Будут ли карты CarPlay отображаться на цифровой приборной панели Touareg?
Продукт iKAGOO Touareg продаётся с маршрутом синхронизации карт CarPlay, но точный путь отображения зависит от соответствующей конфигурации аппаратного обеспечения/контроллера. Работа CarPlay на другом экране в автомобиле сама по себе не доказывает, что навигация появится на приборной панели, поэтому эту функцию следует подтвердить для заказанной версии.
Могу ли я сам установить цифровую приборную панель VW Touareg 7L?
Опытные установщики DIY могут справиться с этим, но это не работа для новичка только с отделкой. Реальный маршрут включает вскрытие оригинальной приборной панели, работу с оригинальной материнской платой, прокладку проводки по приборной панели и перемещение этой платы в область бардачка. iKAGOO классифицирует этот тип работ как уровень 3 «Продвинутый DIY»; профессиональная установка — более безопасный выбор, если вы раньше не работали с приборными панелями.
Что следует проверить, если приборная панель чёрная, перезагружается или показывает новые предупреждающие индикаторы?
Держите приборную панель доступной и сначала задокументируйте симптом. Проверьте основной разъём приборной панели, тонкий штекер, маршрут удлинительного кабеля и подключение сохранённой материнской платы по фотографиям установки. Отправьте в iKAGOO номер заказа, данные автомобиля, фотографии разъёмов и короткое видео неисправности, прежде чем менять несвязанные детали или принудительно применять другую конфигурацию.
Где можно купить эту цифровую приборную панель VW Touareg 7L 2003–2010?
Прямой ответ: та же цифровая приборная панель iKAGOO VW Touareg 7L 2003–2010 доступна на странице товара по ссылке. Если форма оригинальной приборной панели, положение руля, отверстие приборной панели или требуемый маршрут CarPlay/карт ещё не подтверждены, отправьте фотографии автомобиля для проверки совместимости перед заказом.










Add comment
Для отправки комментария вам необходимо авторизоваться.